Appearance
The Queue View
Every workflow queue or group has a queue view that visualises and manages the group's workflows. The queue view is accessed by double-clicking on any workflow queue or group.
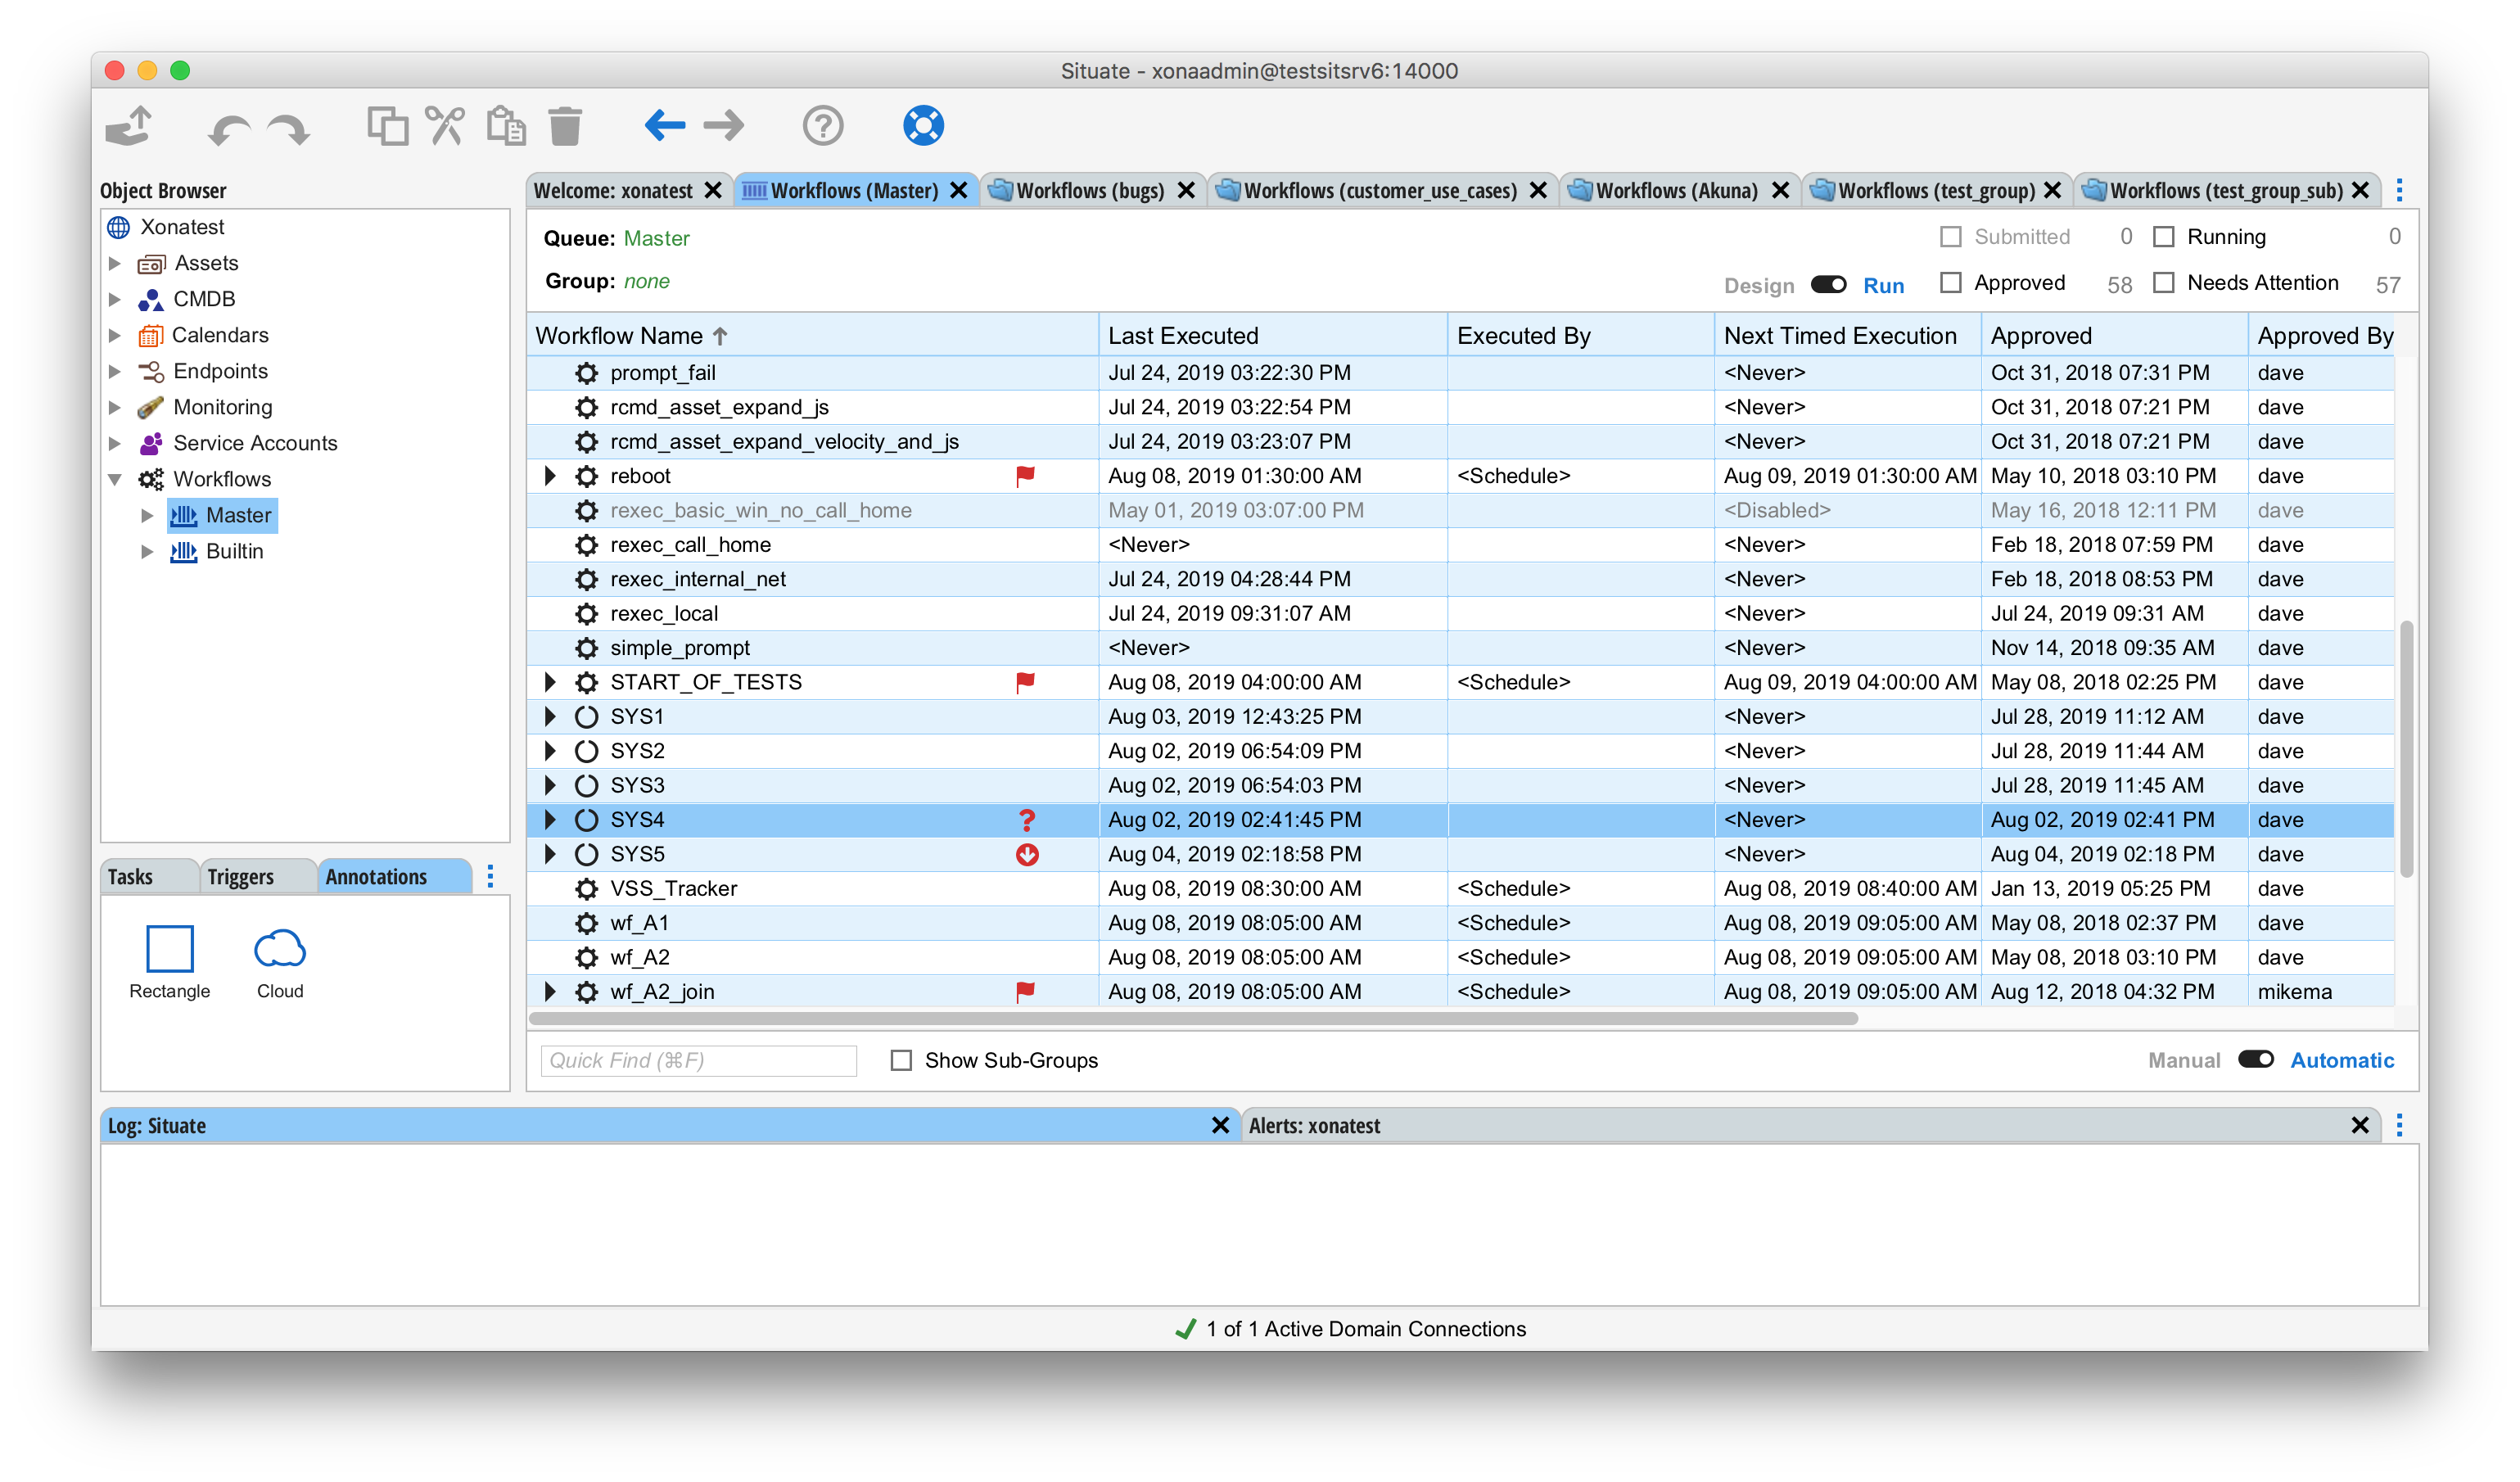
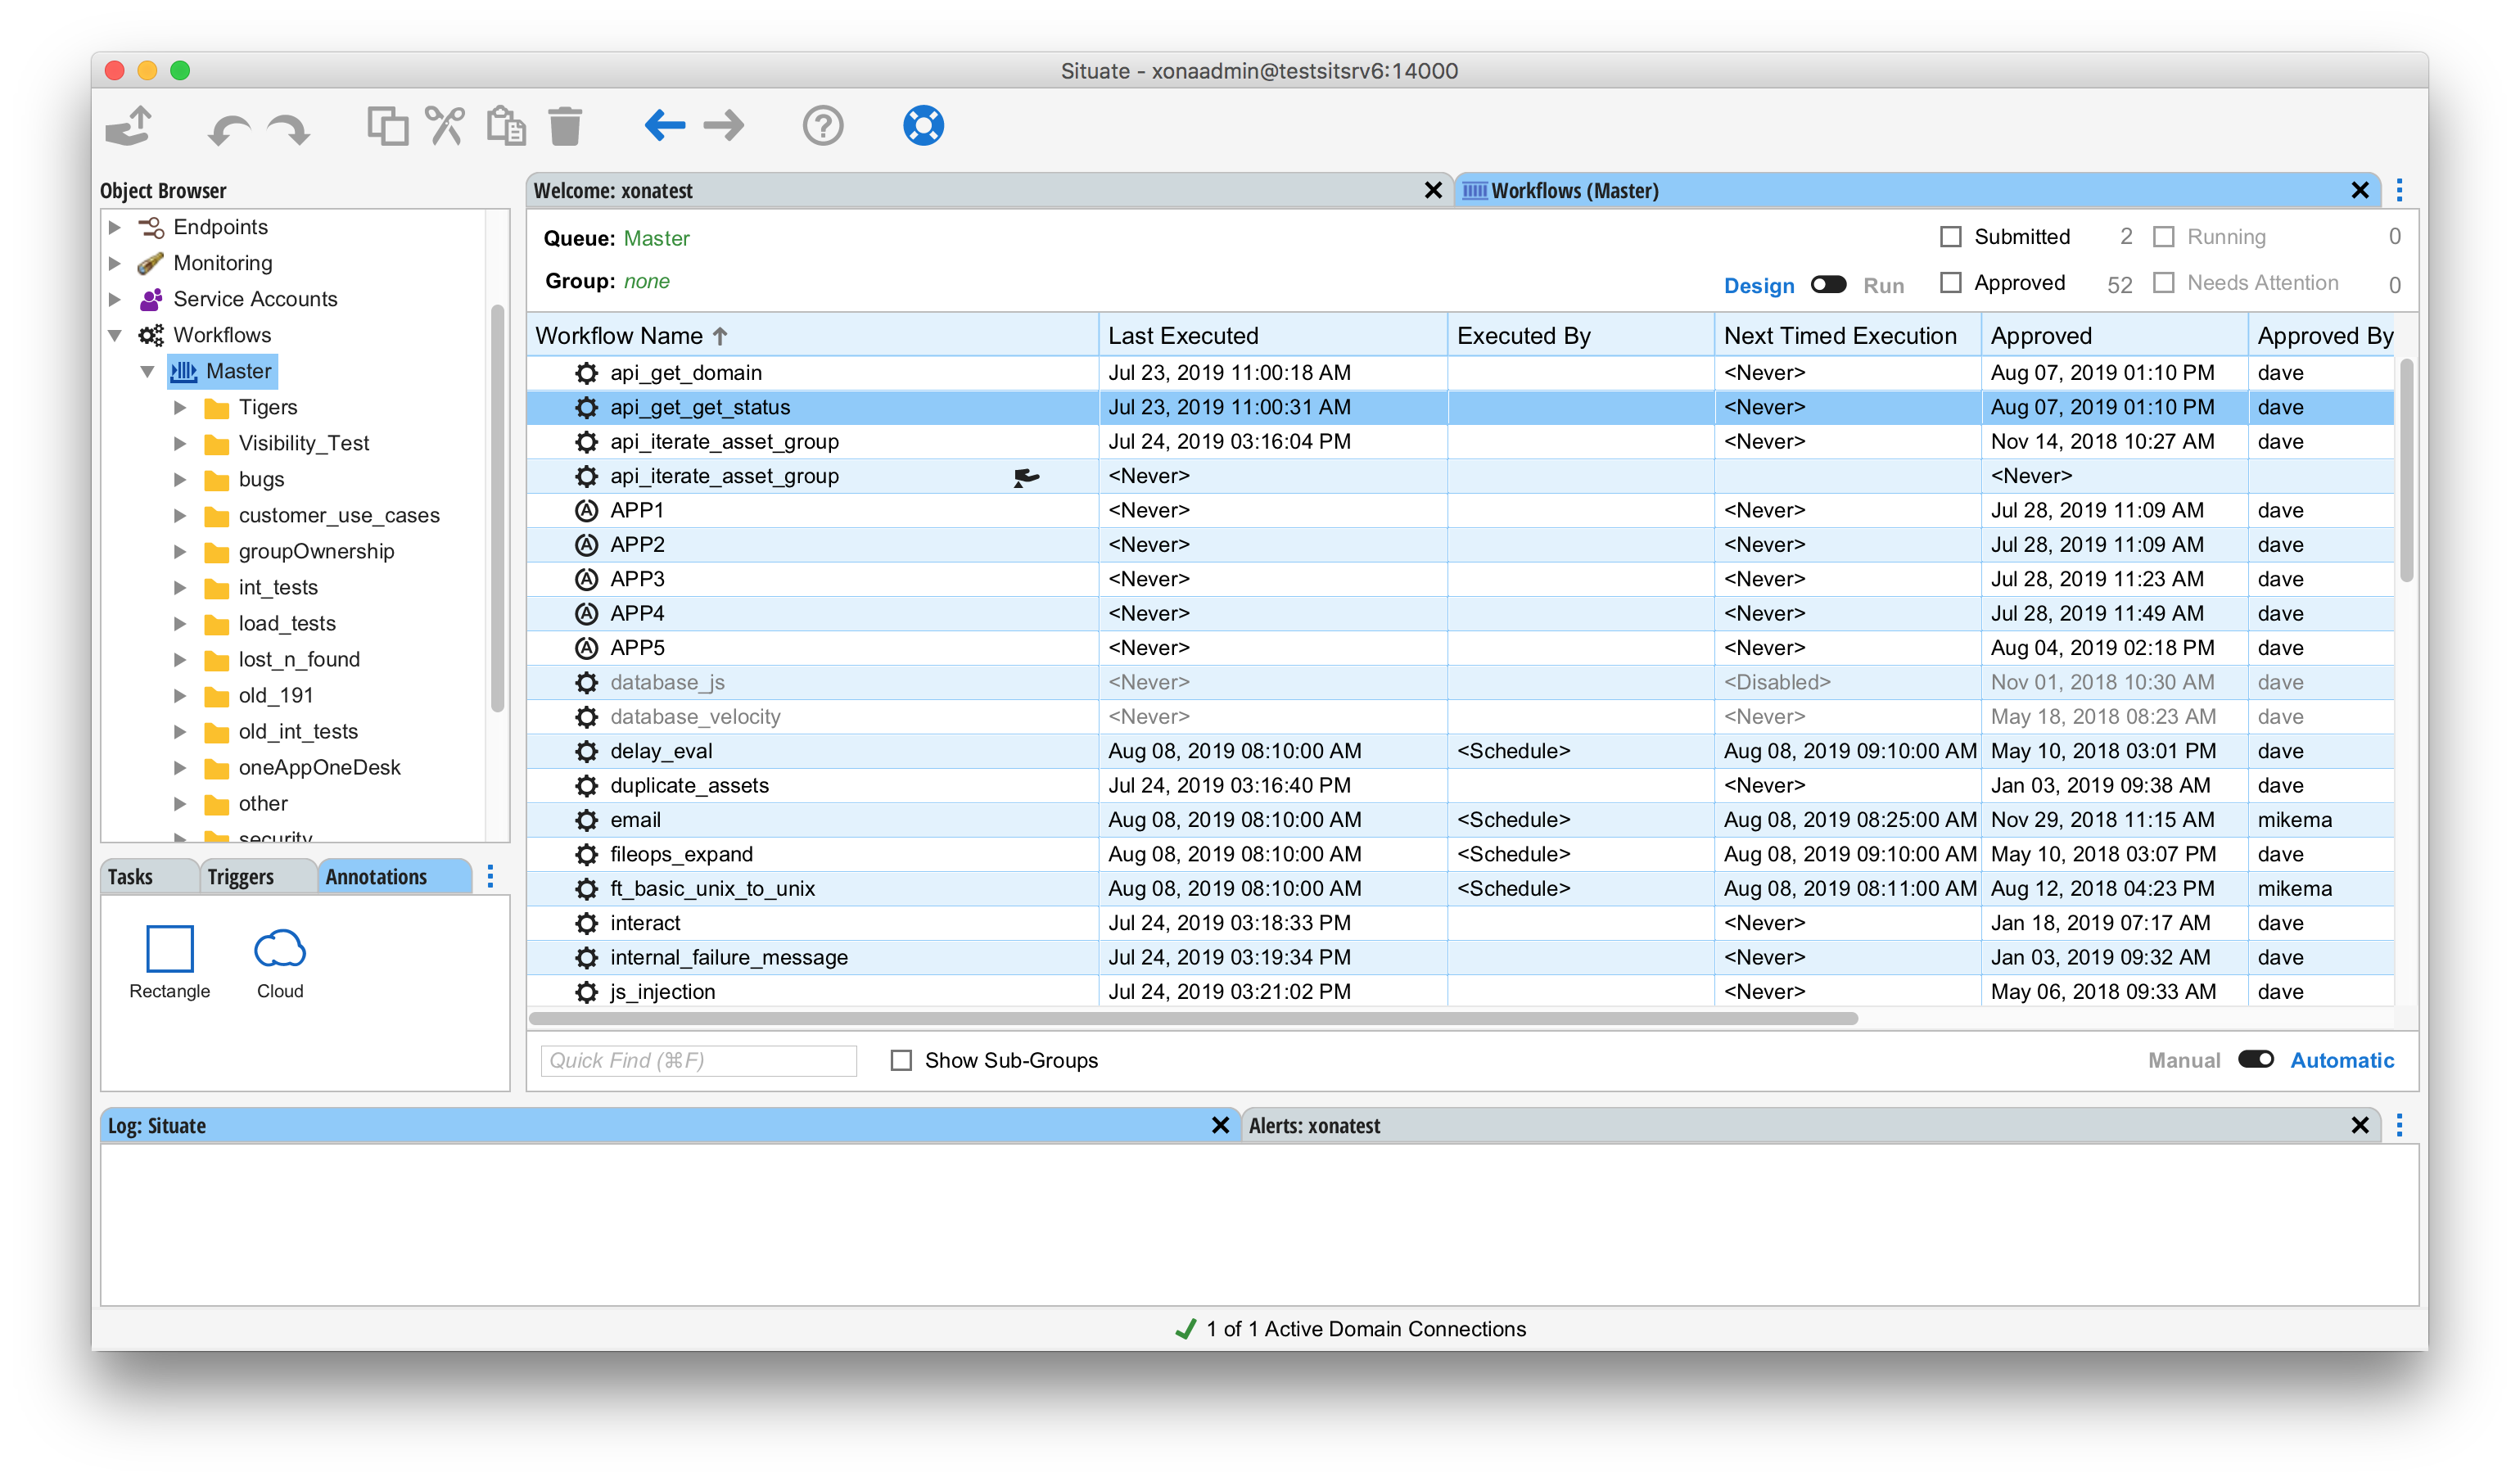
The queue view contains two view modes: design mode and run mode. The mode of the queue view is controlled by a toggle at the top right of the editor pane.
Workflows in the Queue View
Each workflow displayed in the workflow queue presents the following information:
| Workflow Name | The name of the workflow and its type icon. |
|---|---|
| Trigger | The name of the trigger that started the workflow. For workflows that have or are running. |
| Last Executed | The date and time of the workflow's most recent execution. |
| Executed By | The user or service account that executed the workflow. |
| Next Timed Execution | The next scheduled date and time when the workflow will trigger. |
| Approved | The date and time at which the most recent version of the workflow was approved. |
| Approved By | The name of the user or users who approved the most recent version of the workflow. |
| Submitted | The date and time at which the most recent version of the workflow was submitted for approval. |
| Submitted By | The name of the user who submitted the most recent version of the workflow. |
It is also possible to customize the set of columns. See Customizing Columns below.
Workflow Types
The icon displayed with the outer most (not drilled into) rows denotes the type of the workflow. They are:
| Indicates a process, which is a set of steps that execute to accomplish a goal. Processes may be started manually or automatically based on time, or because of some kind of event. Processes are the most common kind of workflow. Cron and batch jobs are a subset of processes. | |
|---|---|
| Indicates a system. A system manages (starts, stops and monitors) one or more application processes. Select system if you want a workflow that manages the lifecycle of one or more applications. | |
| An application template is a building block of a system. The application template describes how to start and stop a single application, component or container. Before you can build a system, you will need at least one application template. |
Design Mode
Design mode is used to author and approve workflows. It is the mode you enter when you want to create, edit or approve a workflow. In design mode, every kind of workflow object is visible. In run mode, some objects that cannot stand by themselves as complete workflows are not shown. Design mode also shows submitted but not yet approved workflows. Run mode does not.
A Closer Look
The name column contains a lot of information.
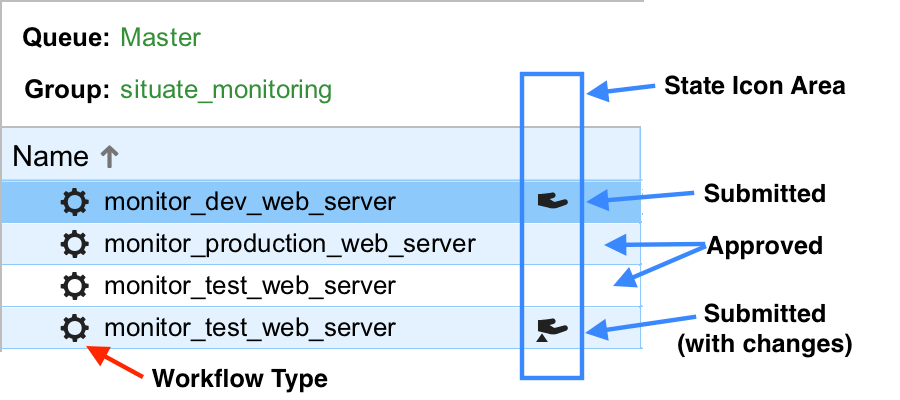
The type of the workflow is indicated by the leftmost icon. Near the right is a state icon. If no state icon is present, the workflow is an approved workflow. The presence of the hand icon ( ) indicates a submitted workflow. When the hand icon contains a small triangle or "delta" ( ) it indicates this submission is a change to an existing approved workflow.
Creating a Workflow
There are two ways to create a workflow. The easiest way is to right-click on the workflow queue or group that is to contain the new workflow and select "New Workflow". You can also do this from the main menu by selecting "File" then "New Workflow...".
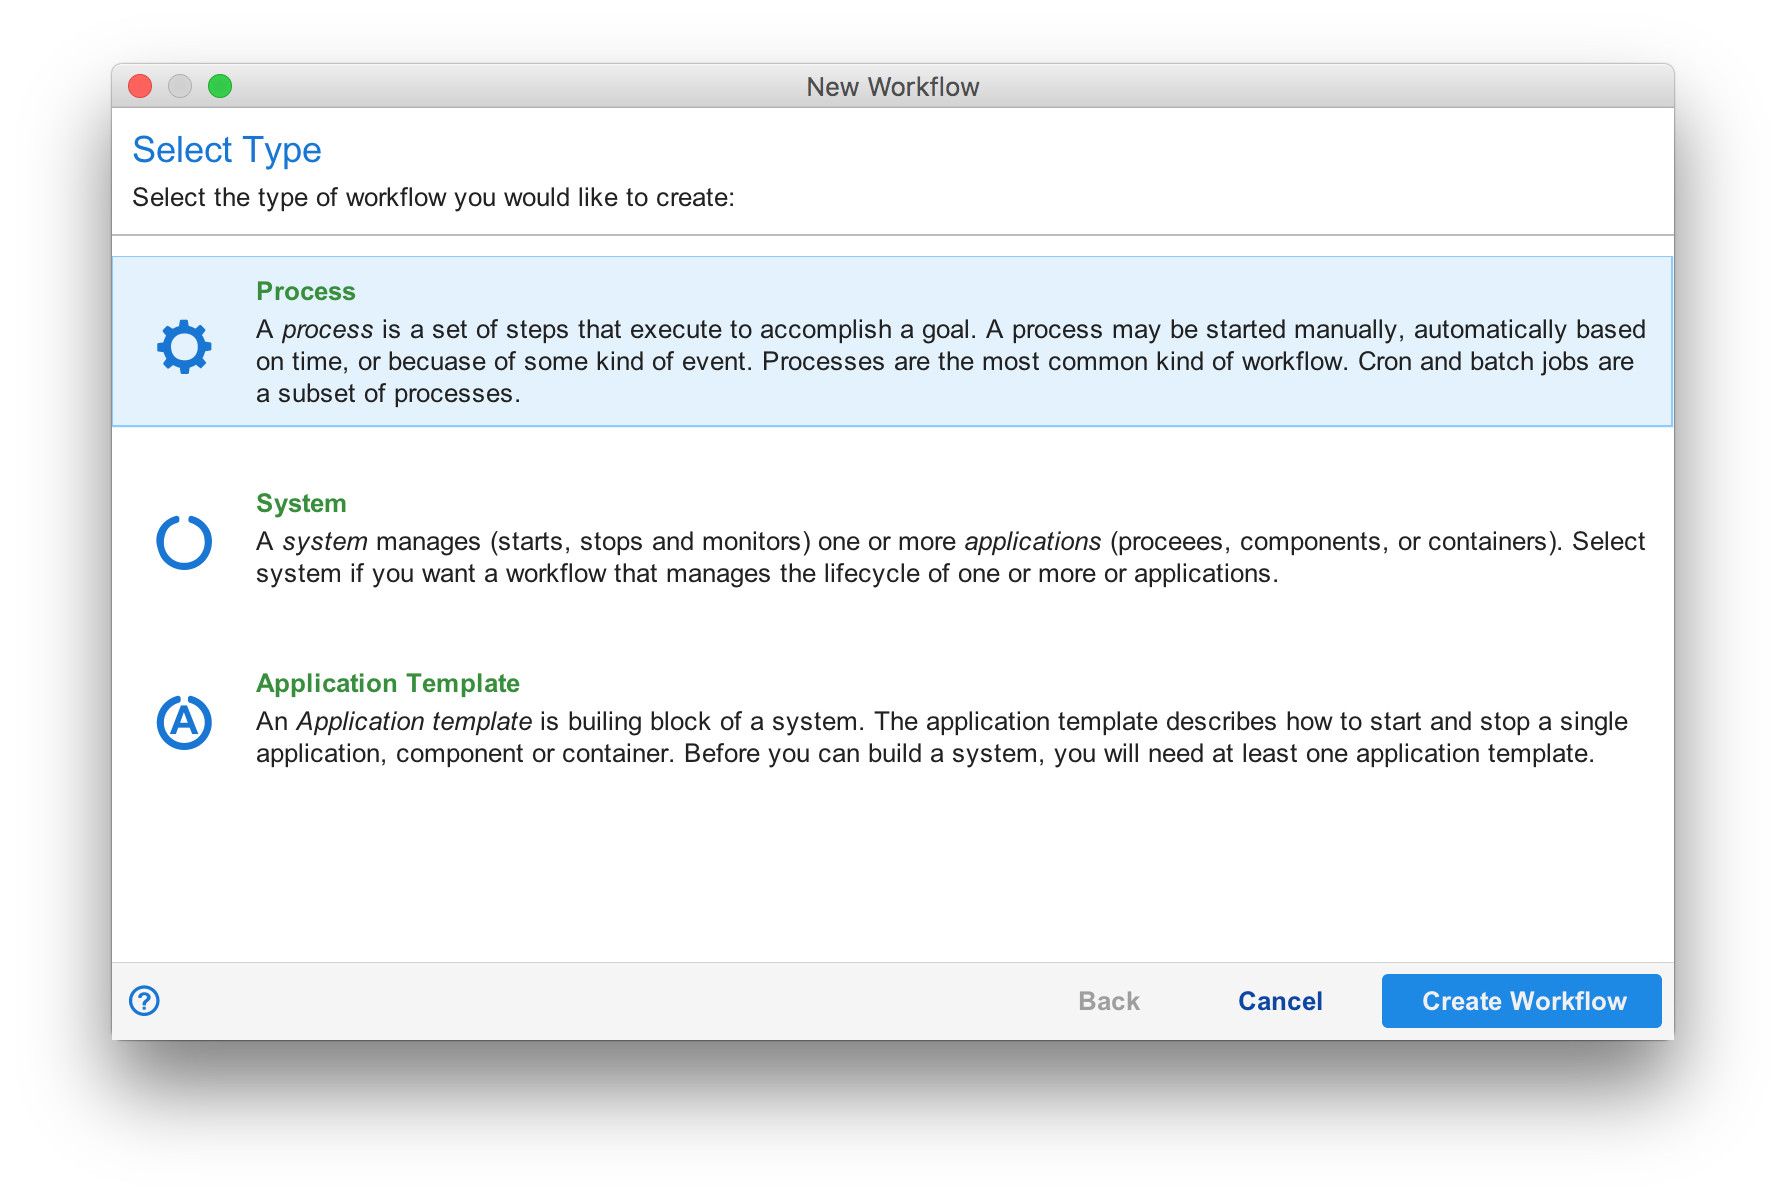
You then need to select the type of workflow object you want to create. The most common type is "Process". After this done, the UI brings up the UI designer. You build your workflow, then press the submit button . This submits your changes for approval. See The Workflow Designer to learn how to design a workflow
Editing a Workflow
To edit a workflow simply right-click on the workflow and select "Edit". This will open the workflow in the workflow designer. Make your changes, then press the submit button . This submits your changes for approval. See The Workflow Designer to learn how to design a workflow
Deleting a Workflow
To delete a submitted or approved workflow, right-click on the workflow and select "Delete".
Importing and Exporting a Workflow
One or more workflows can be exported by selecting them in the queue view, right-click, then select "Export". You can import workflows by selecting the queue or group into which you want the workflow to be placed, then right-click to select "Import". See Importing Workflows for more information.
Approving a Workflow
A workflow is approved by selecting the submitted workflow, right-click, then select "Approve". For more details on approving a workflow, see Approving Workflows.
Run Mode
Run mode is used to manage workflows from an operational perspective. Only approved workflows appear in run mode and some kinds of workflows such as application templates are not shown because they do not constitute a runnable workflow by themselves.
To reduce clutter, running or unconfirmed workflow instances will be shown as children of the confirmed workflow and applications will be shown as children of the system to which they belong.
A Closer Look
The name field again contains a lot of information.
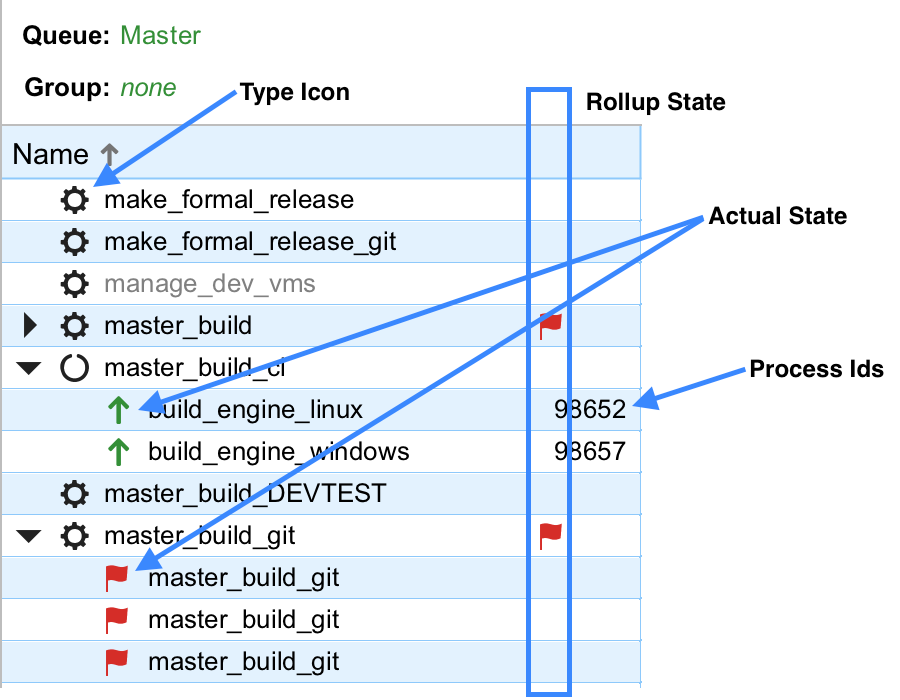
The type icon on the left denotes the kind of workflow (Workflow Types above). The Rollup State shows the "worst" condition among the running or unconfirmed children. The intent is to give you an indication of what you will find if you expand the workflow.
When expanded, you see running or unconfirmed workflows. In this case, the leftmost icon is the actual state of the workflow not the type.
For applications that are running, the process id is also shown. You may right-click on the process id to get special menu actions that can be performed on the process.
The status icons are as follows:
| Icon | Description |
|---|---|
| Denotes a running workflow instance. | |
| Denotes a workflow instance that has completed successfully. | |
| Denotes a workflow instance that has completed with failures. | |
| Denotes a running workflow instance that has been canceled. It is still running but is in the process of stopping. | |
| Denotes a workflow instance that has been canceled. | |
| Denotes an application that is running correctly. | |
| Denotes an application that is running but should be down. | |
| Used in the workflow's roll-up state to signal that at least one application is running that should be down. | |
| Denotes an application that is not running and should not be running. | |
| Denotes an application that is not running that should be running. | |
| Used in the workflow's roll-up state to signal that at least one application is running but should not be. | |
| Denotes an application that is in an unknown state. This typically happens because the Situate server cannot contact the agent upon which the application runs. | |
| Denotes an alert condition. There is a reason this workflow cannot be run. Click on the icon for more information. |
Executing a Workflow
To execute a workflow from a workflow's manual trigger, right-click to select "Execute >" followed by the trigger name you wish to start. You must have read and execute access to a workflow to be able to execute it.
Enabling and Disabling Triggers
Some or all of a workflow's triggers can be enabled or disabled. Triggers must be enabled to fire. Disabling a trigger prevents it from running firing and starting the workflow. You can enable or disable triggers by selecting the workflow and using right-click to select "Enable/Disable Trigger", "Enable All Triggers" or "Disable All Triggers".
Admin Automation Hold
Often there are workflows that have many triggers some of which are purposefully disabled most of the time. In a pinch such as a network outage or some other kind of catastrophic event, you may want to disable one or more workflows. However, disabling all triggers would require you to re-enable only those triggers previously disabled, and in a pinch nobody wants to take time to document which triggers are disabled.
Instead, you can place an automation hold. An automation hold stops all automatic firing of triggers but does not prevent workflows from being started manually (as you may need if you are recovering from a network outage). To set and/or clear administrative holds, select one or more workflows and right-click to select "Admin" then "Set Admin Automation Hold" or "Clear Admin Automation Hold".
It is also possible to set the admin automation hold when exporting or importing workflows. Doing so allows workflows to be submitted and approved but "turned on" at a later time.
Only users that have the "Users can control the queue and set/clear administrative holds" policy can set or clear admin automation holds.
Alerts
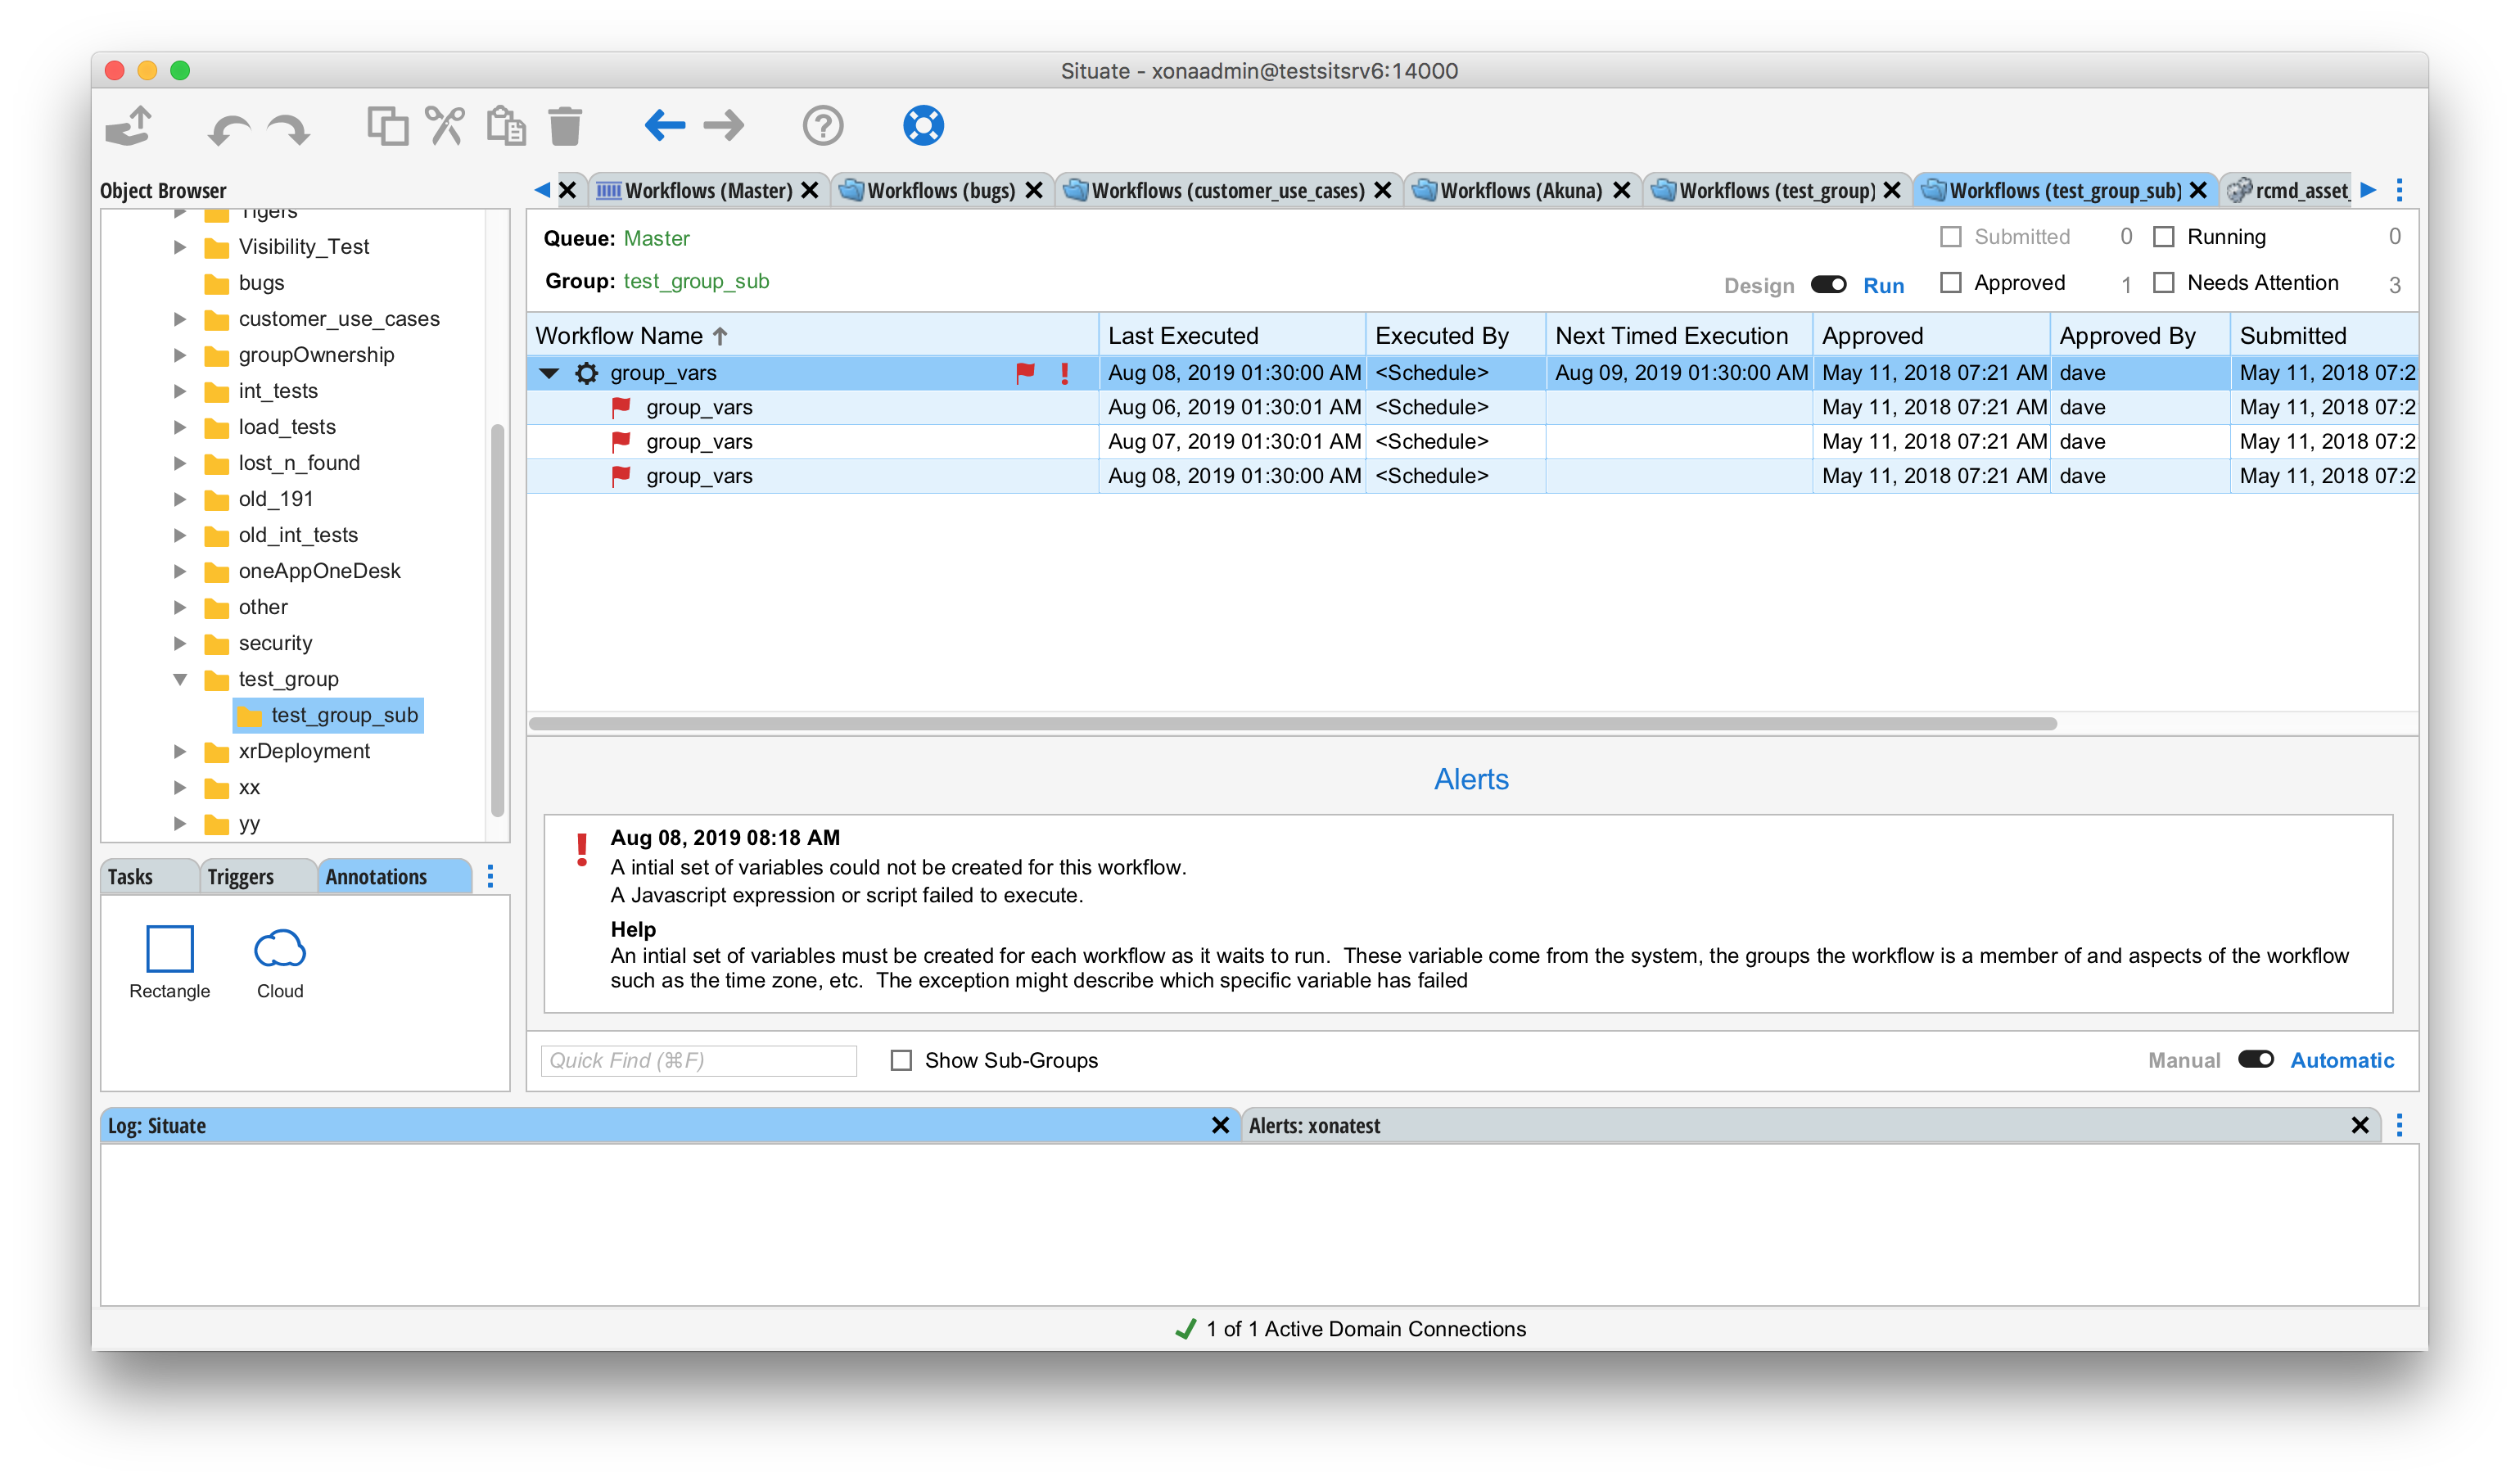
Sometimes there are reasons why a workflow cannot run. For example, let's say there is a file trigger that is supposed to start a workflow whenever a file arrives. But the file trigger is programmed to watch a directory that no longer exists. In this case, the workflow needs to alert someone that it cannot do its job. In this case an alert is generated. The alert appears as a red exclamation mark to the right of the rollup-state icons. Clicking on the alert icon opens the alert detail view at the bottom of the alert view. The alert detail will describe the problem.
Filters
The upper right of the workflow queue contains a set of check boxes that can be used to hide workflows in certain states. The available filters include:
| Submitted | Show only submitted workflows. |
|---|---|
| Approved | Show only Approved workflows. |
| Running | Show only running workflows. |
| Needs Attention | Show only workflows that need attention (unconfirmed). |
Queue Control
The queue control switch in the bottom right allows or disallows the automatic firing of triggers. In an emergency, the queue control can be used to pause the entire queue and prevent Situate from executing any workflow automatically. Only users that have the "Users can control the queue and set/clear administrative holds" policy can pause or resume the queue.